
 Tweet
Tweet
stie cineva de ce cd playerul citeste decat cd originale
-
-
Salut
Citeste si cd audio facute pe Pc. Poate nu le faci tu bine. Foloseste Nero.
Cdplayerul nu are de unde sa stie care este original si care nu

-
Salutare!
Merge si cd-uri facute, dar trebuie scrise cu viteza mica de 10x.
Numai bine si Sarbatori Pascale Fericite!Comment
-
Se recomanda inscriptionarea discurilor audio la viteza mica.Eu folosesc 8X,in medie imi ia 10 minute,pana e gata cd-ul.Daca nu iti citeste decat cele originile,atunci este posibil sa fie uzura la capul optic,sau depunere de praf pe lentila si prisma.Last edited by zsolti1981; 04-22-2011, 17:43 PM.W202 elegance / 1.8 benzina,1993Comment
-
Paste fericit si multumesc de ajutor am sa incerc si am sa va spun daca amreusitComment
-
Baieti am incercat cu diferite viteze 8x 10x cu disc-at-once si cu track-at-once am curatat si capul optic i nimic nu merge ....astept soluci plsss.....Comment
-
Ai convertit melodiile mp3 in .wav inainte de a le scrie audio cd cu nero? Ai incercat sa scrii o imagine de cd audio? Daca nici asta nu functioneaza, am eu un cd player original de vanzare……
Comment
-
Hristos a Inviat!!
Am uitat sa va spun ca in momentul scrierii cd-ului trebuie selectat optiunea audio cd si in acest mod melodiile sunt convertite din mp3 in track-uri. Poate asa va merge. Cel putin la mine merge, astfel am facut vreo 15 cd-uri.
Paste Fericit si multa sanatate!Comment
-
Am convertit melodiile am ales optiunea audio cd si nimic in alte cd playeruri merg numai in cel original de mercedes nu merge e un Audio CD 10 , merg numai cd originale , am cumparat un cd de pe piata (pirateat) si nimic... nu merge.....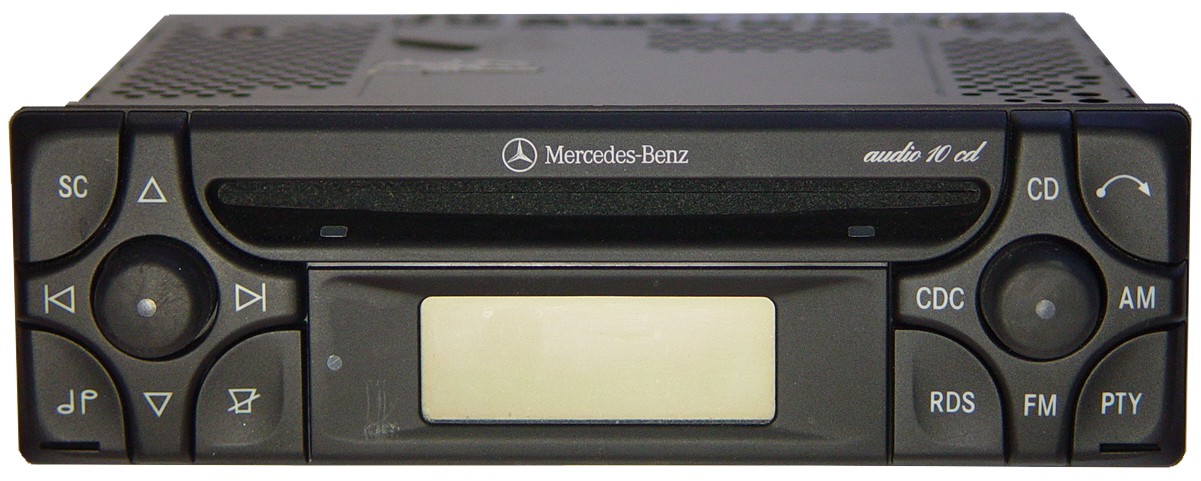
Comment
-
cred ce e aparatul de vina ...am tot cautat si am gasit pe net http://www.audio-10.com/118.htmlComment
-
Du-l la un service specializat si ti-l rezolva baietii de acolo, a avut un prieten si tot asa a facut. Acum citeste tot.1994...Mercedes Benz...w202, c180
Dragoste la prima vedere...
http://www.clubmercedes.ro/w202-merc...2.html?t=10022Comment
-
Aceeasi "buba" o am si eu cu un audio 10 si pe site`ul care la postat wolfy zice asa : Alpine MF2910 plays only original CDs,La service daca il duc aia oare ce io face acolo?stau si ma gandesc,Wolfy daca m-ai esti pe aici te rog raspunde-mi si zi daca ai rezolvat ceva atunci/acum..Comment
-
Poti sa-l si descanti ca doar p-alea originale le va citi.https://www.clubmercedes.ro/forum/hai-sa-ne-prezentam/912676-regulamentComment
-
Colegu,Sauron zice altceva,oare se face vreo improvizatie,nu stiu,stau si ma gandesc,as vrea sa il fac sa citeasca si dastea pirate
Comment
-
Incearca si asa
Make Your Own Copy-Protected CD with Passive Protection
Here’s a great gift idea just in time for the holidays: Make your friends and relatives their very own copy-protected CDs using the same industrial-grade passive protection technology built into XCP and Macrovision discs.
Passive protection exploits subtle differences between the way computers read CDs and the way ordinary CD players do. By changing the layout of data on the CD, it’s sometimes possible to confuse computers without affecting ordinary players — or so the theory goes. In practice, the distinction between computers and CD players is less precise. Older generations of CD copy protection, which relied entirely on passive protection, proved easy to copy in some computers and impossible to play on some CD players. For these reasons, copy protection vendors now use active protection — special software designed to block copying.
Discs with XCP or Macrovision protection employ active protection in conjunction with a milder form of passive protection. You can create your own CD with exactly the same passive protection by following a straightforward five-step procedure. I’ll describe the procedure here, and then explain why it works.
What you’ll need:
■A computer running a recent version of Windows (instructions are Windows-specific; perhaps someone will write instructions for MacOS or Linux)
■Nero, a popular CD burning application
■CloneCD, an advanced disc duplication utility
■Two blank recordable CDs
Step 1: Burn a regular audio CD
Start Nero Burning ROM and create a new Audio CD project. [View] Add the audio tracks that you want to include on your copy-protected disc. [View] When you’re ready to record, click the Burn button on the toolbar. In the Burn tab, make sure “Finalize disc” is unchecked. [View] Insert a blank CD and click Burn. Be careful not to infringe any copyrights! For loads of great music that you can copy legally, visit Creative Commons.
Step 2: Add a data session to the CD
Start another Nero compilation, this time selecting the “CD-ROM ISO” project type. In the Multisession tab, make sure “Start Multisession disc” is selected; and in the ISO tab, make sure Data Mode is set to “Mode 2 / XA”. [View] Add any files that you want to be accessible when the CD is used in a computer. You might include “bonus” content, such as album art and lyrics. [View] For a more professional effect, consider adding the installer for your favorite spyware application and creating an Autorun.inf file so it starts automatically. When you’re finished, click the Burn toolbar button. Insert the audio CD you created in Step 1, and click Burn. [View] Nero should warn you that the disc you’ve inserted is not empty; click Yes to add your data files as a second session. [View]
At this point, you’ve created a CD that contains both audio tracks and data files. The data files you put on the CD should be visible in Windows Explorer (in My Computer, right click the CD icon and click Open) and the audio tracks should be rippable with your favorite audio player. To add passive copy protection, you’ll need to modify the layout of the data on the disc so that the audio tracks are more difficult to access.
Step 3: Rip the CD as a CloneCD image file
Make sure the CD you just created is still in the drive and start CloneCD. Click the “Read to Image File” button. Select your drive and click Next. Choose “Multimedia Audio CD” and click Next. [View] Select an easy to find location for the image file and click OK to begin ripping.
Step 4: Modify the image file to add passive protection
The CloneCD image you created in step 3 actually consists of three files with names ending in .CCD, .IMG, and .SUB. The .CCD file describes the layout of the tracks and sessions on the CD. You’ll edit this file to add the passive protection.
Start Windows Notepad and open the .CCD file. Modifying the file by hand would be tedious, so I’ve created an online application to help. Copy the entire contents of the file to the clipboard and paste it into this form, then click Upload. Copy the output from the web page and paste it back into Notepad, replacing the original file contents. [View] Save the file and exit Notepad.
Step 5: Burn the modified image to create a copy-protected CD
Insert a blank CD and start CloneCD again. Click the “Write From Image File” button. Select the image file you modified in step 4 and click next. Select your CD recorder and click Next. Select “Multimedia Audio CD” and click OK to begin burning. [View]
That’s it! You’ve created your very own copy-protected CD.
Now it’s time to test your disc. If everything worked, the files from the data session will be visible from My Computer, but the audio tracks will not appear in Windows Media Player, iTunes, and most other mainstream music players. The CD should play correctly in standalone CD players.Nu poti ingenunchia un popor deprins sa se tarasca.Comment
Comment